User Authentication (Firebase)
Setting up Firebase Authentication enables your app to support user registration, login, password resets, and more. Here’s how to implement it.
Firebase Account Setup
Before we start, let’s head back to the firebase console. Navigate to your project overview, and you should be able to see a large icon called “Authentication”.
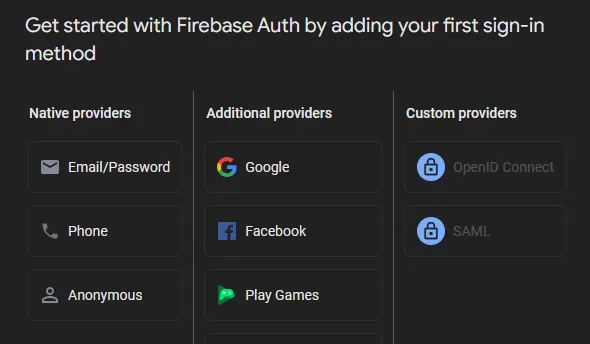
Navigate to that page and click “Get started”.
In this tutorial, we are only going to be working with email and password, but if you’re interested you should try implementing Google SSO as well.
- Click on Email/Password and enable the first option. (Passwordless does not need to be enabled). With that, we should be completely set to implement firebase userAuth!
Challenge 1: Setting Up the User Auth File
Let’s create a separate file that will handle our authentication utility functions.
- Within your
\src\firebasefolder, there should only be a single file calledfirebase.js. Let’s create another file calledauth.js
Challenge 2: Setting up the Authentication Functions
Bear with use because we have a lot of different functions in store for us. This can all be found on the Firebase userAuth documentation. This documentation is not the easiest to follow IMO, so you should look towards other resources or videos if you’re confused. It’s also a good opportunity to ask a mentor!
For this next section, we’ll show a series of code blocks with a brief description. Each of these should be copy and pasted within your auth.js file. At the end, there’ll be a code snippet that contains all of the code in one place.
import { auth } from "./firebase";
import { createUserWithEmailAndPassword, sendEmailVerification, sendPasswordResetEmail, signInWithEmailAndPassword, signInWithPopup, updatePassword } from "firebase/auth";
-
Imports essential functions for user authentication
export const doCreateUserWithEmailAndPassword = async (email, password) => {
  return createUserWithEmailAndPassword(auth, email, password);
}; -
This function registers a user with their email and password.
export const doSignInWithEmailAndPassword = (email, password) => {
  return signInWithEmailAndPassword(auth, email, password);
}; -
Signs in an existing user with email and password.
export const doSignOut = () => {
  return auth.signOut();
}; -
Signs out the current user.
export const doPasswordReset = (email) => {
  return sendPasswordResetEmail(auth, email);
}; -
Sends a password reset email to the provided email address.
export const doPasswordChange = (password) => {
  return updatePassword(auth.currentUser, password);
}; -
Updates the current user’s password.
export const doSendEmailVerification = () => {
  return sendEmailVerification(auth.currentUser, {
      url: `${window.location.origin}/home`,
  });
}; -
Sends an email verification to the current user, with a redirect URL to your homepage after verification.
Here’s the final code for this challenge.
Step 3: Create an Authentication Context
You might be wondering what Auth Context is. In simple terms, it enables our application to access authentication data.
Let’s dedicate a separate folder for our authentication contexts within our \src folder. Let’s call it \contexts and within that folder create a file called authContext.jsx . To recap, the structure should be \src\contexts\authContext.jsx
Within this file, let’s start by importing the auth object from our firebase.js file. Let’s not forget the auth functions that we just created in our previous step.
import { createContext, useContext, useEffect, useState } from 'react';
import { onAuthStateChanged, signInWithEmailAndPassword, createUserWithEmailAndPassword, signOut } from 'firebase/auth';
import { auth } from '../firebase/firebase';

export const useAuth = () => useContext(AuthContext);

export const AuthProvider = ({ children }) => {

return (
);
};
Note that the line we have in yellow highlights implements what is called the useAuth hook. This allows our components to access our authentication data. This is vitally important for the rest of our code, and we will be calling on this object often.
Our AuthProvider Component enables us to put other components inside of it which can utilize authentication data as well.
Authentication State Listener
import { createContext, useContext, useEffect, useState } from 'react';
import { onAuthStateChanged, signInWithEmailAndPassword, createUserWithEmailAndPassword, signOut } from 'firebase/auth';
import { auth } from '../firebase/firebase';

const AuthContext = createContext();

export const useAuth = () => useContext(AuthContext);

export const AuthProvider = ({ children }) => {
const [user, setUser] = useState(null);

useEffect(() => {
  const unsubscribe = onAuthStateChanged(auth, (user) => {
      setUser(user);  // Ensure 'user' state is updated
  });
  return unsubscribe;
  }, []);

  return (
);
};
This code is quite important so bear with us as we explain this to you. In this snippet, we are implementing what is called listener.
onAuthStateChangedis a function that we imported in a previous step. This firebase function is the listener. When it observes a change to the user’s authentication state such as a login, logout, etc. it will invoke a callback. Afterward, it will returnunsubscribewhich will essentially detach the listener upon when the component unmounts. This is especially important in order to avoid wasting computational power.
Authentication Function Implementation
import { createContext, useContext, useEffect, useState } from 'react';
import { onAuthStateChanged, signInWithEmailAndPassword, createUserWithEmailAndPassword, signOut } from 'firebase/auth';
import { auth } from '../firebase/firebase';

const AuthContext = createContext();

export const useAuth = () => useContext(AuthContext);

export const AuthProvider = ({ children }) => {
const [user, setUser] = useState(null);

useEffect(() => {
  const unsubscribe = onAuthStateChanged(auth, (user) => {
      setUser(user);  // Ensure 'user' state is updated
  });
  return unsubscribe;
  }, []);


const login = (email, password) => signInWithEmailAndPassword(auth, email, password);
const register = (email, password) => createUserWithEmailAndPassword(auth, email, password);
const logout = () => signOut(auth);

  return (
);
};
If you recall from earlier, we created some basic functions earlier within our auth.js file. We have those methods imported at the top of our code, and we’ll now define new functions that will pass in the necessary information.
Returning HTML Code
...
  return (
  <AuthContext.Provider value={{ user, login, register, logout }}>
    {children}
  </AuthContext.Provider>
);
Now we update our function return so all the children of this component have access to the user state and the authentication functions we made.
Challenge 3: Creating the Login Page
Now that we’re done configuring our userAuth system, let’s start implementing it! Let’s start off with creating the Login page.
In our \src\pages folder, create a new file called LoginPage.jsx .
import React, { useEffect, useState } from 'react';
import { Link, useNavigate } from 'react-router-dom';
import { useAuth } from '../contexts/authContext';

function LoginPage() {

  return (
      <div>LoginPage</div>
  );
}

export default LoginPage;
Creating a form
function LoginPage() {
  return (
      <div className="flex items-center justify-center h-screen">
          <form className="p-6">
              <h2 className="">Login</h2>
              <input
                  type="email"
                  placeholder="Email"
                  className="p-2 mt-2 w-full"
                  required
              />
              <input
                  type="password"
                  placeholder="Password"
                  className="p-2 mt-2 w-full"
                  required
              />
              <button type="submit" className="p-2 mt-4 w-full">Login</button>
          </form>
      </div>
  );
}

export default LoginPage;
Making our page functional
Now that we made our form, we need to add functionality to our component.
import React, { useEffect, useState } from 'react';
import { Link, useNavigate } from 'react-router-dom';
import { useAuth } from '../contexts/authContext';

function LoginPage() {
  	const { user, login } = useAuth();
  const [email, setEmail] = useState('');
  const [password, setPassword] = useState('');
  const [error, setError] = useState('');

  const handleSubmit = async (e) => {
      e.preventDefault();
      try {
          await login(email, password);
      } catch (error) {
          setError('Invalid credentials, please try again.');
      }
  };

  return (
      <div className="flex items-center justify-center h-screen">
          <form onSubmit={handleSubmit} className="p-6">
              <h2 className="">Login</h2>
              {error && <p className="">{error}</p>}
              <input
                  type="email"
                  placeholder="Email"
                  value={email}
                  onChange={(e) => setEmail(e.target.value)}
                  className="p-2 mt-2 w-full"
                  required
              />
              <input
                  type="password"
                  placeholder="Password"
                  value={password}
                  onChange={(e) => setPassword(e.target.value)}
                  className="p-2 mt-2 w-full"
                  required
              />
              <button type="submit" className="p-2 mt-4 w-full">Login</button>
          </form>
      </div>
  );
}

export default LoginPage;
Here we made a function handleSubmit. This functions calls the login function we made in our authContext.js using the email and password we pass in. If there is an error of some sorts, we tell our user their credentials are incorrect.
Successful Login Navigation
When our user correctly logs into their account, they need to be routed to the main page. Let’s add that functionality
import React, { useEffect, useState } from 'react';
import { Link, useNavigate } from 'react-router-dom';
import { useAuth } from '../contexts/authContext';

function LoginPage() {
  ...
  const navigate = useNavigate();

  useEffect(() => {
      if (user) {  // Check if a user is logged in
          navigate('/home'); // Redirect to home if logged in
      }
  }, [user, navigate]);  // 'user' state triggers navigation to /home

  const handleSubmit = async (e) => {
      e.preventDefault();
      try {
          await login(email, password);
          navigate('/home');  // Ensure you navigate to '/home' after login
      } catch (error) {
          setError('Invalid credentials, please try again.');
      }
  };

  return (
     ...
  );
}

export default LoginPage;
We can add the hook useNavigate to help with our page routing. Now if we call this navigate hook and provide a route, our user will be sent to whatever page we want after logging in. Additionally, we can check the user authentication state to automatically route them if they’ve already logged in. We can also give them the option to route to our navigation page, which is coming up now!
With the useNavigate hook, we can now route our user to a destination that we specify. For our purposes right now, upon a successful login, the user will be sent to the homepage. Furthermore, say the user was already logged in, then they will automatically be redirected.
Challenge 4: Creating a Registration Page
We added a login page, but what if we don’t have an account? Let’s fix that with a registration page!
In our \src\pages folder, create a new file called RegisterPage.jsx
import React, { useState } from 'react';
import { Link, useNavigate } from 'react-router-dom';
import { useAuth } from '../contexts/authContext';

function RegisterPage() {
  return (

  );
}

export default RegisterPage;
Creating a form
Same as before, lets make a form with inputs for an email and password.
import React, { useState } from 'react';
import { Link, useNavigate } from 'react-router-dom';
import { useAuth } from '../contexts/authContext';

function RegisterPage() {
  return (
      <div className="flex justify-center items-center h-screen">
          <div className="p-8 w-full sm:w-96">
              <h2 className="mb-6">Register</h2>

              <form>
                  <div className="mb-4">
                      <label className="block">Email</label>
                      <input
                          type="email"
                          id="email"
                          className="mt-1 block w-full px-4 py-2"
                          required
                      />
                  </div>

                  <div className="mb-4">
                      <label className="block">Password</label>
                      <input
                          type="password"
                          id="password"
                          className="mt-1 block w-full px-4 py-2"
                          required
                      />
                  </div>

                  <button type="submit" className="w-full py-2">Register</button>
              </form>

              <div className="mt-4 text-center">
              </div>
          </div>
      </div>
  );
}

export default RegisterPage;
Making our Page Functional
import React, { useState } from 'react';
import { Link, useNavigate } from 'react-router-dom';
import { useAuth } from '../contexts/authContext';

function RegisterPage() {
  const [error, setError] = useState('');
  const { register } = useAuth();
  const [email, setEmail] = useState('');
  const [password, setPassword] = useState('');

  const handleRegister = async (e) => {
      e.preventDefault();
      try {
          await register(email, password);
      } catch (error) {
          setError('This email is already registered. Please use a different email.');
      }
  };

  return (
      <div className="flex justify-center items-center h-screen">
          <div className="p-8 w-full sm:w-96">
              <h2 className="mb-6">Register</h2>

              {error && <p className="mb-4">{error}</p>}

              <form onSubmit={handleRegister}>
                  <div className="mb-4">
                      <label htmlFor="email" className="block">Email</label>
                      <input
                          type="email"
                          id="email"
                          className="mt-1 block w-full px-4 py-2"
                          value={email}
                          onChange={(e) => setEmail(e.target.value)}
                          required
                      />
                  </div>

                  <div className="mb-4">
                      <label htmlFor="password" className="block">Password</label>
                      <input
                          type="password"
                          id="password"
                          className="mt-1 block w-full px-4 py-2"
                          value={password}
                          onChange={(e) => setPassword(e.target.value)}
                          required
                      />
                  </div>

                  <button type="submit" className="w-full py-2">Register</button>
              </form>

              <div className="mt-4 text-center">
              </div>
          </div>
      </div>
  );
}

export default RegisterPage;
To do this we make the function handleRegistration . This function takes in our email and password inputs and registers a new account in our Firebase Authentication. We handle potential errors like poorly formatted emails or an email already in use.
Successful Registration Navigation
Now lets add the routing.
import React, { useState } from 'react';
import { Link, useNavigate } from 'react-router-dom';
import { useAuth } from '../contexts/authContext';

function RegisterPage() {
  const [error, setError] = useState('');
  const { register } = useAuth();
  const navigate = useNavigate();

  const handleRegister = async (e) => {
      e.preventDefault();
      try {
          await register(email, password);
          navigate('/home');  // Redirect to home after registration
      } catch (error) {
          setError('This email is already registered. Please use a different email.');
      }
  };

  return (
     ...
  );
}

export default RegisterPage;
Login Page Access
Lastly, let’s create a Link to our Login page for a better user experience.
import React, { useState } from 'react';
import { Link, useNavigate } from 'react-router-dom';
import { useAuth } from '../contexts/authContext';

function RegisterPage() {
 ...

  return (
      <div className="flex justify-center items-center h-screen">
          <div className="p-8 w-full sm:w-96">
              <h2 className="mb-6">Register</h2>

              {error && <p className="mb-4">{error}</p>}

              <form onSubmit={handleRegister}>
                  <div className="mb-4">
                      <label htmlFor="email" className="block">Email</label>
                      <input
                          type="email"
                          id="email"
                          className="mt-1 block w-full px-4 py-2"
                          value={email}
                          onChange={(e) => setEmail(e.target.value)}
                          required
                      />
                  </div>

                  <div className="mb-4">
                      <label htmlFor="password" className="block">Password</label>
                      <input
                          type="password"
                          id="password"
                          className="mt-1 block w-full px-4 py-2"
                          value={password}
                          onChange={(e) => setPassword(e.target.value)}
                          required
                      />
                  </div>

                  <button type="submit" className="w-full py-2">Register</button>
              </form>

              <div className="mt-4 text-center">
                  <p className="">
                      Already have an account?{' '}
                      <Link to="/login" className="">Login here</Link>
                  </p>
              </div>
          </div>
      </div>
  );
}

export default RegisterPage;
Challenge 5: Creating a Landing Page
We need some kind of page that users are initially brought to. This is called out landing page and will have the options to either Login with an existing account or register a new one.
In our \src\pages folder, create a new file called LandingPage.jsx
import React from 'react';
import { Link } from 'react-router-dom';

function LandingPage() {
return (
    <div>LandingPage</div>
);
}

export default LandingPage;
Creating the title for the page
Let’s add a title and some helpful information.
import React from 'react';
import { Link } from 'react-router-dom';

function LandingPage() {
return (
  <div className="flex flex-col items-center justify-center h-screen">
    <h1 className="">Welcome to Ripple & Refresh</h1>
    <p className="text-lg text-darkblue mb-6">Please log in or register to continue</p>
  </div>
);
}

export default LandingPage;
Adding Routing to Our Other Pages
Nothing new here, lets add some routing to our LoginPage and RegisterPage.
import React from 'react';
import { Link } from 'react-router-dom';

function LandingPage() {
return (
  <div className="flex flex-col items-center justify-center h-screen">
    <h1 className="">Welcome to Ripple & Refresh</h1>
    <p className="text-lg text-darkblue mb-6">Please log in or register to continue</p>
    <div className="flex space-x-4">
      <Link to="/login" className="px-6 py-3">
        Login
      </Link>
      <Link to="/register" className="px-6 py-3">
        Register
      </Link>
    </div>
  </div>
);
}

export default LandingPage;
Making Our Landing Page The First Page Seen
We now need to update our App.jsx so that our Landing page is what the user is initially brought to. Make sure to import our new pages and authContext!
import Navbar from "./components/Navbar";
import FeaturedItem from "./components/FeaturedItem";
import Dashboard from "./components/Dashboard";
import React from "react";
import { BrowserRouter as Router, Routes, Route } from "react-router-dom";
import MapPage from "./pages/MapPage";
import ActivityPage from "./pages/ActivityPage";
import RsvpPage from "./pages/RsvpPage";
import LoginPage from './pages/LoginPage';
import RegisterPage from './pages/RegisterPage';
import LandingPage from './pages/LandingPage';
import { AuthProvider } from './contexts/authContext';

function App() {
  return (
      <AuthProvider>
          <Router>
              <Routes>
                  {/* Landing Page at Root Path */}
                  <Route path="/" element={<LandingPage />} />

                  <Route
                      path="/home"
                      element={
                           <>
                               <Navbar />
                               <FeaturedItem />
                               <Dashboard />
                           </>
                      }
                  />
                  <Route path="/map" element={<Page />} />
                  <Route path="/activity" element={<ActivityPage />} />
                  <Route path="/rsvp" element={<RsvpPage />} />
                  <Route path="/login" element={<LoginPage />} />
                  <Route path="/register" element={<RegisterPage />} />
              </Routes>
          </Router>
      </AuthProvider>
  );
}

export default App;
Let’s note some key changes within our App.jsx file
- Of course we first added the necessary imports to render what we need
- More importantly, notice how we have a new Wrapper element called
<AuthProvider>. This relates to theAuthContextfile that we created earlier, but essentially we are wrapping our application which enables it to share auth state and utility functions. - Previously, our
/path would direct to our home page. But now it directs to the landing page. We created a new path called/homewhich serves as our new homepage url.
Challenge 6: Limiting Site Access
The last thing we want is for an unauthorized user accessing our important pages. We can prevent this by changing any url they access if they are not properly verified. This can be accomplished by using “Private Routes” which enforces a user to be authenticated before having access rights.
We haven’t done this in a while but let’s create a new file within the \src\components folder! Let’s name it PrivateRoute.jsx.
import React from 'react';
import { Navigate } from 'react-router-dom';
import { useAuth } from '../contexts/authContext';

function PrivateRoute() {
  <div>PrivateRoute</div>
}

export default PrivateRoute;
Since we are going to be wrapping this component around our other components, lets use props to pass in children
import React from 'react';
import { Navigate } from 'react-router-dom';
import { useAuth } from '../contexts/authContext';

function PrivateRoute({ children }) {

  return children;
}

export default PrivateRoute;
Next lets check the state of our user from our useAuth hook. If the user is valid (not UNDEFINED), then we can proceed with returning the children. Otherwise, we send them back to the landing page.
...

function PrivateRoute({ children }) {
  const { user } = useAuth();  // Create the user object with the useAuth function.
  	// note that if the user does not exist, the object is UNDEFINED
  // Redirect to LandingPage if not logged in
  if (!user) {
      return <Navigate to="/" />;  // Correct redirect for non-logged-in users
  }

  // Otherwise, render the child components
  return children;
}

export default PrivateRoute;
Now if we go into our App.jsx and add these private routes, we should have now limited access to our website to only authenticated users. Don’t forget to import the Private Route component!
import Navbar from "./components/Navbar";
import FeaturedItem from "./components/FeaturedItem";
import Dashboard from "./components/Dashboard";
import React from "react";
import { BrowserRouter as Router, Routes, Route } from "react-router-dom";
import MapPage from "./pages/MapPage";
import ActivityPage from "./pages/ActivityPage";
import RsvpPage from "./pages/RsvpPage";
import LoginPage from "./pages/LoginPage";
import RegisterPage from "./pages/RegisterPage";
import LandingPage from "./pages/LandingPage";
import { AuthProvider } from "./contexts/authContext";
import PrivateRoute from "./components/PrivateRoute";

function App() {
return (
  <AuthProvider>
    <Router>
      <Routes>
        {/* Landing Page at Root Path */}
        <Route path="/" element={<LandingPage />} />
        {/* Protected Routes */}
        <Route
          path="/home"
          element={
            <PrivateRoute>
              <>
                <Navbar />
                <FeaturedItem />
                <Dashboard />
              </>
            </PrivateRoute>
          }
        />
        {/* Browse route displaying Navbar and BrowsePage */}
        <Route
          path="/map"
          element={
            <PrivateRoute>
                <Navbar />
              <MapPage />
            </PrivateRoute>
          }
        />
        <Route
          path="/activity"
          element={
            <PrivateRoute>
                <Navbar />
              <ActivityPage />
            </PrivateRoute>
          }
        />
        <Route
          path="/rsvp"
          element={
            <PrivateRoute>
                <Navbar />
              <RsvpPage />
            </PrivateRoute>
          }
        />
        {/* Public Routes */}
        <Route path="/login" element={<LoginPage />} />
        <Route path="/register" element={<RegisterPage />} />
      </Routes>
    </Router>
  </AuthProvider>
);
}

export default App;
Navbar Functionality Adjustment
Because we have now redefined the / path to direct to the Landing Page, let’s make sure that clicking on the Ripple & Refresh logo takes us to the Home page.
Navigate the your Navbar.jsx file and make the highlighted adjustment!
import React from "react";
import { Link } from "react-router-dom";

function Navbar() {
  return (
    <>
      <div className="flex flex-row justify-between items-center px-20 py-4 bg-pastelblue">
      {/* TITLE */}
        <Link to="/home" className="text-darkgreen text-3xl poppins-bold hover:text-pastelgreen transition duration-300">
        Ripple & Refresh
        </Link>
        {/* PAGES */}
        ...
    </>
  );
}
export default Navbar;
Congratulations!👏
You may have noticed they we did not cover all the authentication functions we made like signing out and resetting our password. That’s up to you to figure out now on your own.
This is by far the heaviest back-end concept, so give yourself a big pat on the back for a job well done with getting through this section! When you’re ready, move forward to the other pages. Don’t worry, they’re going to be much easier